
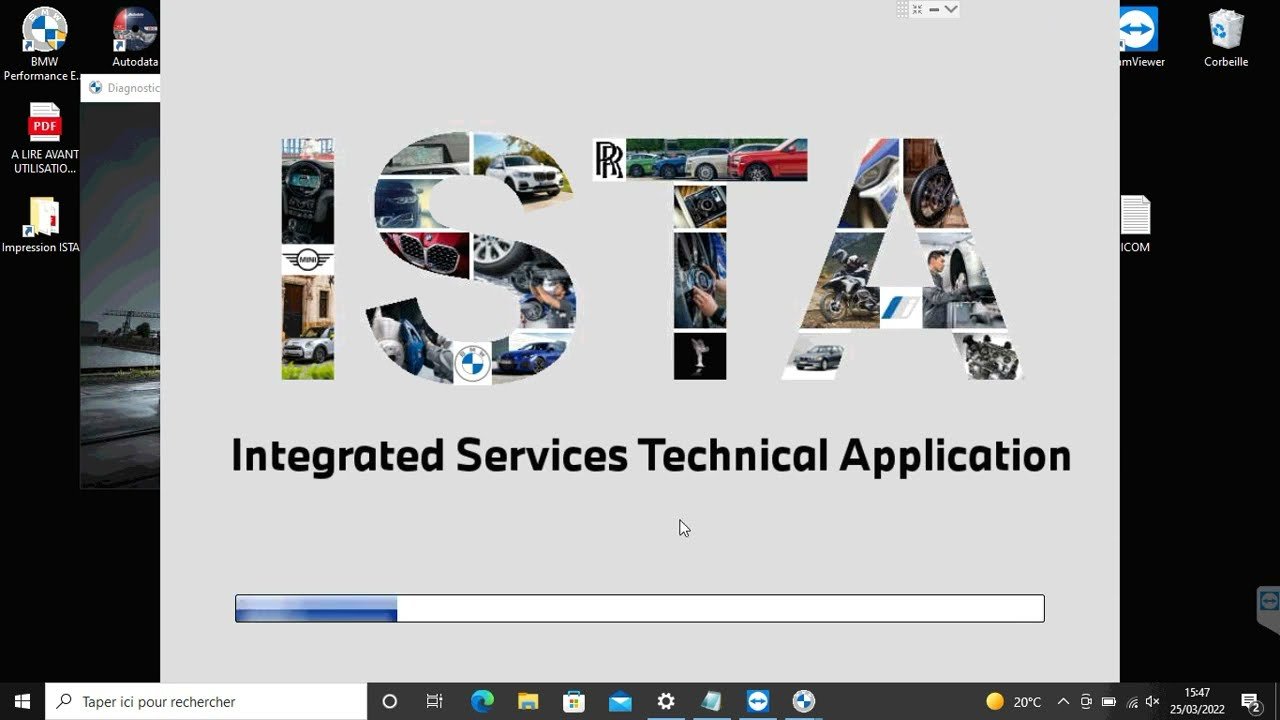
How to perform an ICOM firmware update with ease
How to update ICOM firmware with ISTA+
De nombreuses personnes ont rencontré des problèmes pour mettre à jour le firmware de l’ICOM via ISTA+ depuis les deux dernières mises à jour du FW de l’ICOM. Lorsqu’ils essaient de mettre à jour, il est indiqué que ISTA commence le processus de mise à jour, mais il disparaît après quelques secondes et les informations “Firmware” sont toujours affichées sur ISTA. Bien sûr, il existe une autre façon de le mettre à jour : via une interface web, de la même manière que les ICOM A2 peuvent être mis à jour.
Video :
ICOM Firmware Update Steps
1. Connect theICOM to the computer using the LAN cable, power the ICOM with 12V through the power adapter or the car.
2. Open http://169.254.92.38:60080/ in IE browser (only after connecting the ICOM to the laptop and powering it, you can open it), username: root, password: NZY11502
3. Click “Firmware Update”, you will see the firmware version information of ICOM.
4. Choose “ICOM-BootImage-01-26-00c.bin”, set “image type” to “SYSTEM”, then click “Send File”. (You can find the update files in the desktop folder titled “TOOLs”)
5. When it asks “Write image file to flash memory?”, click “Yes”, the ICOM LED will be red.
6. When it asks “SYSTEM IMAGE update was successful”, click “Firmware Update”.
7. Choose “ICOM-ApplicationImage-01-41-02c.bin”, set “image type” to “APPLICATION”, then click “Send File”, it will take a few minutes. (You can find the update files in the desktop folder titled “TOOLs”)
8. When it asks “Write image file to flash memory?”, click “Yes”, the ICOM LED will flash red again.
9. Wait for everything to finish, then “start it again”.
10. ICOM firmware updates are complete.

After my high school studies, I decided to specialize in the automotive field. So I went to study automotive engineering in Grenoble where I obtained a master's degree in mechanical engineering for passenger vehicles.
Passionate about OBD (On-Board Diagnostic) technology, which allows drivers to diagnose their car themselves using the elaborate system embedded in their vehicles connected via Bluetooth/Wi-Fi or USB with a compatible personal computer such as Windows PC/ Linux/MacOsX such as ELM327 WiFi), I started my professional career as a technical writer after having completed several practical internships with different Lyon automobile garages in order to deepen my technical knowledge for this sector and acquire sufficient practical experience necessary that could be useful when products software achievements.
Over the years, I had developed some additional passions in particular: travel, computing (IOT & IP Networks) and Jazz music. It is thus that thanks to these additional skills enriched during all his extra-professional adventures that he was able to establish a bridge between his professional and private life offering him more equally interesting and diversified professional opportunities
I like working on complex projects linked to this fairly cutting-edge technology (preventive maintenance, advanced engine error diagnostics) because it allows me to take on stimulating technical challenges which constantly improve my skills and my expertise in this sector.
As a technical editor for Bosch France, I often had the opportunity to participate in seminars organized by their partners, suppliers or internal distributors. Thus during a professional trip to China to attend a conference on new trends in the Chinese automotive market ( 2020)


Leave a Reply